Thursday, May 8, 2014

How to disassociate or remove ADF Security in an ADF Application

afd-config.xml - Remove
<adf-security-child xmlns="http://xmlns.oracle.com/adf/security/config">
    <JaasSecurityContext initialContextFactoryClass="oracle.adf.share.security.JAASInitialContextFactory"
                         jaasProviderClass="oracle.adf.share.security.providers.jps.JpsSecurityContext"
                         authorizationEnforce="true"
                         authenticationRequire="true"/>
  </adf-security-child>

weblogic.xml - Remove
<security-role-assignment>
    <role-name>valid-users</role-name>
    <principal-name>users</principal-name>
  </security-role-assignment>

web.xml - Remove
Goto security tab and then change:
Login authentication option to none
Delete security roles.
Delete security constraints.
<filter>
    <filter-name>JpsFilter</filter-name>
    <filter-class>oracle.security.jps.ee.http.JpsFilter</filter-class>
    <init-param>
      <param-name>enable.anonymous</param-name>
      <param-value>true</param-value>
    </init-param>
    <init-param>
      <param-name>remove.anonymous.role</param-name>
      <param-value>false</param-value>
    </init-param>
  </filter>

  <filter-mapping>
    <filter-name>JpsFilter</filter-name>
    <url-pattern>/*</url-pattern>
    <dispatcher>FORWARD</dispatcher>
    <dispatcher>REQUEST</dispatcher>
    <dispatcher>INCLUDE</dispatcher>
  </filter-mapping>

<servlet>
    <servlet-name>adfAuthentication</servlet-name>
    <servlet-class>oracle.adf.share.security.authentication.AuthenticationServlet</servlet-class>
    <init-param>
      <param-name>success_url</param-name>
      <param-value>/faces/page1.jspx</param-value>
    </init-param>
    <load-on-startup>1</load-on-startup>
  </servlet>

<servlet-mapping>
    <servlet-name>adfAuthentication</servlet-name>
    <url-pattern>/adfAuthentication</url-pattern>
  </servlet-mapping>


<filter-mapping>
    <filter-name>adfBindings</filter-name>
    <servlet-name>adfAuthentication</servlet-name>
    <dispatcher>FORWARD</dispatcher>
    <dispatcher>REQUEST</dispatcher>
  </filter-mapping>

  <filter>
    <filter-name>adfBindings</filter-name>
    <filter-class>oracle.adf.model.servlet.ADFBindingFilter</filter-class>
  </filter>

jps-config.xml

Remove all the login modules, identity store, credential store, key store from the respective tabs.


Once this is done then, ADF Security is removed. Jazn-data.xml file can also be removed.
Sunday, October 14, 2012

Configuring KeyStore credentials in JDeveloper


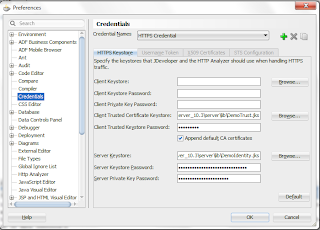
In order to authenticate to https services, the server side public certificate must be acquired and added as a trusted cert entry to a keystore used by the client.  This certificate can be imported using the browser as shown in the screen shot below. This keystore stores a reference to the public certificate of the service and will be using some alias. The certificate for a web service can be obtained from the service WSDL url. Save the imported certificate to local drive.


Import Service certificate to a keystore file
·         keytool -importcert -alias testkey -file servicecertificatefile.cer  -keystore  .\my-keystore.jks -storepass keystorepassword

Tip:  keytool utility can be found the path <jdk_install_dir>/bin

List the contents of a keystore
·         keytool -list -keystore ".\my-keystore.jks"

Steps to specify the keystore that JDeveloper should use for handling https traffic:
·         Go to Tools à Preferences
·         In the LHS tree node select credentials
·         Configure the Client Trusted Certificate Keystore pointing to the my-keystore.jks location created earlier and provide the key store password


Saturday, October 6, 2012

Programmatic approach to insert record in ADF


Best approach to create or insert a row in the table which requires some custom logic to be built which needs to be called and after processing the data is to have the method which inserts/creates the row in the Application Module implementation class. Then create the data control of the method. Then bind the method to the view , where backing bean would call this create method.

Below given code is the one,which will be the method in AppModuleImpl.java. To see this class you will have to go to the AppModule.xml in Overview mode  and then click on the Java tab. Click on the edit icon which looks like a pencil and then generate the classes.


public String create(Integer a, Integer b, Integer c,
                              java.util.Date d) {
    String result="Create Complete!";
    AttributeList at = new AttributeListImpl();
    at.setAttribute("A", a);
    at.setAttribute("B", b);
    at.setAttribute("C", c);
    at.setAttribute("D", d);
    Row row = getCase1View1().createAndInitRow(at);

    at.setAttribute("A", a);
    at.setAttribute("B", b);
    at.setAttribute("C", c);
    at.setAttribute("D", d);
    this.getEmp1View1().getDBTransaction().commit();
   
      return "created";
     
  }


To expose the method as a data control, you need to click on the Client Interface  edit icon and then select the method and save. This process will create a client interface java class which will expose the method as a data control. Which can then be binded to the view.


Then the below given code can be used in the managed bean to call the method binded.

         DCBindingContainer bindings =
        (DCBindingContainer)BindingContext.getCurrent().getCurrentBindingsEntry();

        OperationBinding op = (OperationBinding)bindings.getOperationBinding("create");
        op.getParamsMap().put("a", 1);
        op.getParamsMap().put("b", 1);
        op.getParamsMap().put("c", 1);
        op.getParamsMap().put("d", new Date());
        op.execute();


Thursday, October 4, 2012

Programmatic Data Retrieval in ADF


// Get the binding context and the binding entry for the current view.
DCBindingContainer bindings =  
(DCBindingContainer)BindingContext.getCurrent().getCurrentBindingsEntry();
   
// Get the iterator binding instance from the iterators binded to the view
DCIteratorBinding it = (DCIteratorBinding)bindings.get("UsersView1Iterator");
   
// Retrieve the view object instance from the iterator binding, this would have the result set.
// Set the where clause with the attribute and view name
ViewObject viewObject = it.getViewObject();
viewObject.setWhereClause("USERNAME = '" + username +"'");
   
// Execute the query to retrieve the record
viewObject.executeQuery();
     
   
// Retrieve the Row from the row set retrieved
// viewObject.hasNext() can be used to iterate through the row set.
Row r = viewObject.next();
   
// Now obtain the value from the retrieved row.
String userid = r.getAttribute("AccountId").toString();
   

Friday, August 24, 2012

ADF Security


Implementing ADF Security

By default the in an ADF application the security is not enabled. For people who have worked on Webcenter Application Template would actually notice a difference. As in Webcenter portal application it is enabled by default. But in ADF application you can enable ADF security by following the below screen shots easily. When you enable ADF security in an ADF application a jazn-data.xml file gets created. This file stores all the security related configuration done by the user at the design time. You can create users, groups, roles in this file and then grant permission for the resources such as taskflows, pages etc. When the application is deployed on the weblogic server then the users are created at the server level. Using the ADF security configuration wizard you can also generate the login.html and error.html files as well as configure the welcome/home page after user successfully logins. 
All the security related information of the authenticated user can be retrieved from the ADF security context object. This object can be accessed in the managed beans as well as the web pages. To access the object in the web page you would need to use the expression language.


I would also like to share an article on ADF Security from Frank Nimphus. Below is the link for the same:


Thursday, April 12, 2012

ADFBC - Dependent LOV with a create form.

Found that people are still having issues with creating dependent LOV and use the same to show up in create mode for the forms. Below steps describe the scenario devlopment and also given is the link to download the sample project.

Note: Development of the sample is using the pre-installed hr schema in the Oracle XE database, Using Jdev 11.1.2.x:

Step1: Create a new ADF application named 'ADFBCApp'.

Step2: Create the database connection (either using the Application overview that opens up on application creation or by using the new connection ) to the hr database schema.

Step3: Create the EO and ViewObjects for 'Countries' and the 'Locations' tables from the hr schema. Make sure when the EO and VO's get generated the App Module is checked so that the vO's get exposed as data controls.

Step4: Open the LocationsView.xml file which has got generated in the Model project if you have selected Model as the project during ADF BC generation.

Step5: Goto the Attributes tab. Select the CountryId attribute. Click on the List of Values tab and then click on the "+" sign. A wizard opens to configure the LOV. In the wizard now select the data source by clicking the "+" sign, that would be "CountriesView1"  and then select the  list attribute to be CountryId. In the UI Hint select the CountryName as the UI Hint to insure that the name of the country appears in the dropdown instead of the non user friendly "CountryId".

Step6:
Create a new view object for StatesViewLOV. This will be a SQL query view object, use the below given query to achieve the same.

SELECT distinct
    LOCATIONS.STATE_PROVINCE STATE_PROVINCE
FROM
    LOCATIONS
where country_id=:p_country
Also, add a bind variable to the SQL Query view object named p_country. It the same as the one used in the query.

Step 7:
Now open the LocationsView1.xml in Overview mode again. Navigate to the Attributes tab. Select StateProvince attribute. And add the LOV to the attribute as mentioned in step 5. But make sure you select StatesViewLOV instead of CountriesView1 as data source.

Step 8:
Now create a ADF bounded task flow (name it as task1) and a form1.jsff view file. Drag and drop the LocationView1 data control from the data control tab on the application navigator on the jsff page and select ADF form with submit button checked as the view component to be binded.

Step 9: For the CountryId select one choice component, in the Property inspector make the AutoSubmit property to be true. Then for the StateProvince field set the partial trigger attribute in property inspector to the CountryId field id (ex: soc2).

Step10: Now drag and drop the Create operation from the LocationsView -> Operations data control on the taskflow  diagram view. Then Drag and drop the jsff created. And link the two from Create operation to jsff using the ControlFlow component in the component palette. Keep the link event to be as it it. And save all the changes.

Step11:
Create a jspx page(name untitled1.jspx in the sample project) and then drag and drop the task1 taskflow from the Pageflows folder on the jspx page and select Region as the option for view binding.
Now run the untitled1.jspx page to see the Dependent LOV in create mode working.

Please use this link (ADFBCApp.zip) to download the sample project.
  

Saturday, March 10, 2012

iPad Support for ADF

Coolest stuff in Jdev and ADF release 11.1.1.6 is:
ADF Faces and DVT components are now certified on iPad. 

All the ADF Faces and DVT components now support touch gestures for interactivity on the touch-enabled devices. 
Also, touch support has been enabled for :
1. Drag and Drop
2. Tooltips
3. Data tips
4. Context menus.  
This support is enabled through the new v1.2 version of the FusionFx and FusionFx-simple families of skins.